一、样式适配前的须知
- 我们知道前端写的页面是运行在各式各样宽度大小的屏幕上,当然用户也可以去自定义页面大小(任意拖拽),在这个时候,我们要在这不确定的页面展示区域,尽可能的保证页面的功能与展示效果。
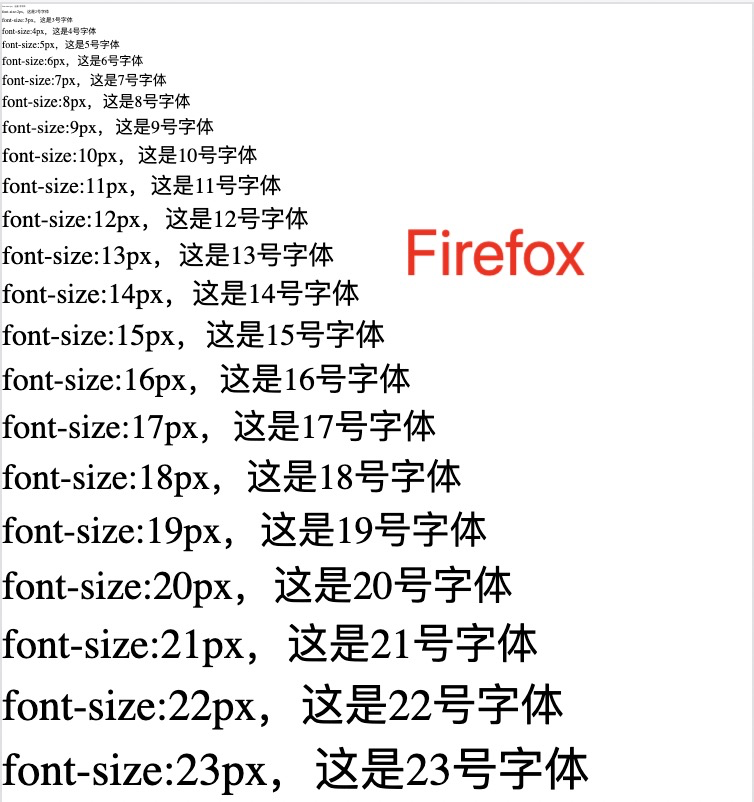
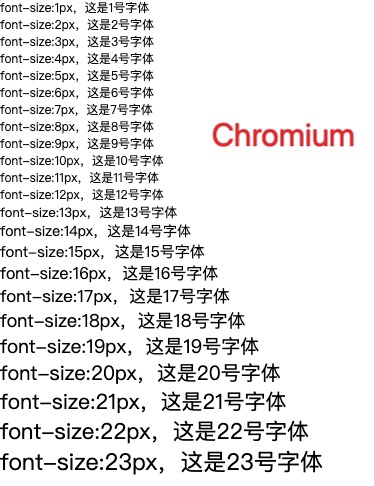
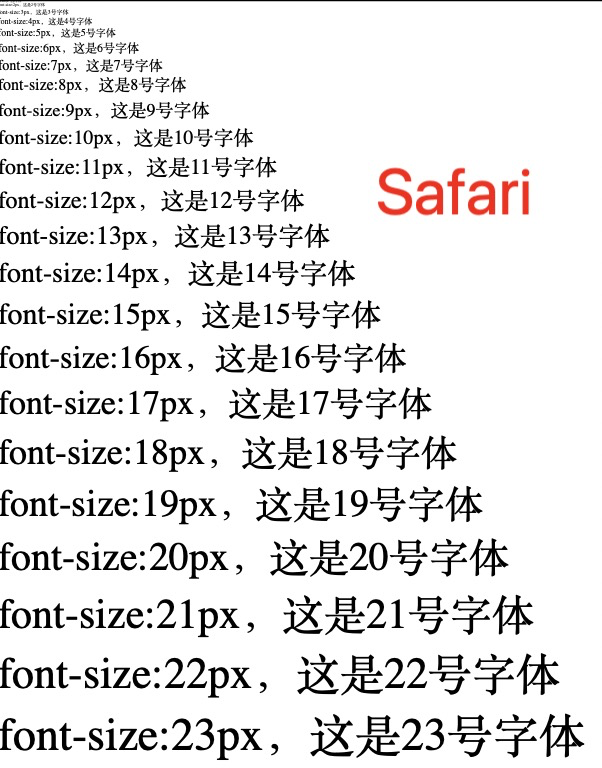
- 环境的兼容性/版本/差异/css支持程度。基础知识(例子1):浏览器pc端字体不能小于12px,移动端字体不能小于8px。这确实是基本认知。但实际上我们需要了解但更多【下面会有个demo】
环境认知【chrome渲染内核规则就是chrome的,模拟器也是】
各浏览器所用内核:(了解概念-不同厂商也有一定自己的初始化样式规则)
1、IE浏览器内核:Trident内核,也是俗称的IE内核
2、Chrome浏览器内核:统称为Chromium内核或Chrome内核,以前是Webkit内核,现在是Blink内核
3、Firefox浏览器内核:Gecko内核,俗称Firefox内核
4、Safari浏览器内核:Webkit内核
5、Opera浏览器内核:最初是自己的Presto内核,后来是Webkit,现在是Blink内核
6、360浏览器、猎豹浏览器内核:IE+Chrome双内核
7、搜狗、遨游、QQ浏览器内核:Trident(兼容模式)+Webkit(高速模式)
8、百度浏览器、世界之窗内核:IE内核
二、样式适配项目-可配置内容
2.1)移动端 - meta标签
<meta name="viewport"content="width=device-width, user-scalable=no, initial-scale=1.0, maximum-scale=1.0, minimum-scale=1.0">name='viewport' 通知运行环境-渲染之前我要对窗口进行修改了
width=device-width 这是啥(这是移动端与pc端差距最大的地方)【物理像素与逻辑像素】
控制台直接调用window.devicePixelRatio 你可以看到不同的dpr比例
一般来说:pc端1物理像素等于1逻辑像素 应为pc端dpr就是1,1px == 1px
加了这句话width=device-width initial-scale=1.0, maximum-scale=1.0, minimum-scale=1.0
移动端dpr目前大部分为2 也有部分为3
所以这几话就是说,不管dpr多大或多小,都是使用1倍的比例使 1逻辑像素 = 1物理像素 (缩放比例为1倍)
最后展示的时候,我们会发现在移动端,我们使用写1px,实际为2px(经典问题:移动端一像素线,下面会有解决方案)
user-scalable=no
禁止使用手势进行缩放经验:【移动端开发加上这一行meta信息】
2.2)rem
使用场景:由于rem是一个相对计算单位,不要一贯依赖使用rem,rem不是万能的,适配,合适的地方时候合适的方案。
快速使用:
// 去npm上下载包lib-flexible,安装到你到项目依赖文件中
然后直接在主执行文件引入即可
import 'lib-flexible/flexible.js'
注意点:
- 不要全部使用rem【重要的话说三遍】
- 根元素的font-size可能会计算失败,请注意给默认值
- 使用rem注意dpr为3的设备和width > 1024px (显示就很小)
- 相对上下布局,尽量少使用rem,例:top/bottom
2.3) px
使用场景:当前而言,明确规定的固定样式和弹窗,多使用px
2.4)百分比% (vw/vh)(box-sizing:border-box)
可适配对大多数场景
在以文档流的布局方案来看,从上至下,不足着换行
使用场景:给父元素定义百分比,子元素继承相对应百分比
2.5)em
使用场景:当前项目中使用极其少,后续有同学设计单文件组件时候,可以给组件内子元素使用em。因为在自己封装组件,又要做到适配,可以给自己的组件写font-size。无需考虑外部引用环境。
2.6)media - 媒体查询
场景:特殊需要适配的地方可以使用,相当于在宽度范围内:定制样式。用的时候是很爽,一直用,一直爽,如果你不介意后期维护成本的话
语法:
@media screen and(max-width:600px){
    /**
        */
    html{
     font-size:32px;
    }
}
media query
可以做到设备像素比的判断,方法简单,前期成本较低,
特别是对于PC端和移动端维护同一套代码的时候;Bootstrap框架就是使用这种方式布局

缺点:
代码量大,维护不方便 -为了兼顾大屏幕或高清设备,会造成其他设备资源浪费,特别是加载图片资源

页面需要最大宽度
2.7)flex布局 倾情推荐
不会用的,特殊属性忘记了的,去阮一峰老板博客康康:http://www.ruanyifeng.com/blog/2015/07/flex-grammar.html
)总结
推荐顺序 (当然方法这么多,没有绝对,还是一句话:合适才是最好的)
flex > px > 100%(vw/vh) > rem > media > em
三、场景复现
3.1)场景:字体大小
- 其实其他浏览器已经开始支持小于12px字体,但以Chromium为内核的浏览器占据大部分市场份额
- 移动端设备样式一样,不同的设备有的可以支持8px,有的只能支持10px/12px.....
- 我们要做到向上兼容 最优解12px
<!DOCTYPE html>
<html lang="en">

<head>
    <meta charset="UTF-8">
    <title>Document</title>
    <meta name="viewport"content="width=device-width, user-scalable=no, initial-scale=1.0, maximum-scale=1.0, minimum-scale=1.0">
    <style>
        * {
            margin: 0;
            padding: 0;
        }
    </style>
</head>

<body>
    <p style="font-size:1px">font-size:1px,这是1号字体</p>
    <p style="font-size:2px">font-size:2px,这是2号字体</p>
    <p style="font-size:3px">font-size:3px,这是3号字体</p>
    <p style="font-size:4px">font-size:4px,这是4号字体</p>
    <p style="font-size:5px">font-size:5px,这是5号字体</p>
    <p style="font-size:6px">font-size:6px,这是6号字体</p>
    <p style="font-size:7px">font-size:7px,这是7号字体</p>
    <p style="font-size:8px">font-size:8px,这是8号字体</p>
    <p style="font-size:9px">font-size:9px,这是9号字体</p>
    <p style="font-size:10px">font-size:10px,这是10号字体</p>
    <p style="font-size:11px">font-size:11px,这是11号字体</p>
    <p style="font-size:12px">font-size:12px,这是12号字体</p>
    <p style="font-size:13px">font-size:13px,这是13号字体</p>
    <p style="font-size:14px">font-size:14px,这是14号字体</p>
    <p style="font-size:15px">font-size:15px,这是15号字体</p>
    <p style="font-size:16px">font-size:16px,这是16号字体</p>
    <p style="font-size:17px">font-size:17px,这是17号字体</p>
    <p style="font-size:18px">font-size:18px,这是18号字体</p>
    <p style="font-size:19px">font-size:19px,这是19号字体</p>
    <p style="font-size:20px">font-size:20px,这是20号字体</p>
    <p style="font-size:21px">font-size:21px,这是21号字体</p>
    <p style="font-size:22px">font-size:22px,这是22号字体</p>
    <p style="font-size:23px">font-size:23px,这是23号字体</p>
</body>

</html>
经验:【规定字体大小不能小于12px】
3.2)场景:移动端 一像素线
经验:【引用下面文件-然后按照下面步骤】
把下面文件引入,给我们需要加上一像素线的大兄弟,写上一个class='border'
给你的boder使用伪元素,此乃真1像素
.border::before {
  border-bottom: 1px solid #e6e6e6;
}
/* stylelint-disable */
@charset "utf-8";
.border,
.border-top,
.border-right,
.border-bottom,
.border-left,
.border-topbottom,
.border-rightleft,
.border-topleft,
.border-rightbottom,
.border-topright,
.border-bottomleft {
position: relative;
}
.border::before,
.border-top::before,
.border-right::before,
.border-bottom::before,
.border-left::before,
.border-topbottom::before,
.border-topbottom::after,
.border-rightleft::before,
.border-rightleft::after,
.border-topleft::before,
.border-topleft::after,
.border-rightbottom::before,
.border-rightbottom::after,
.border-topright::before,
.border-topright::after,
.border-bottomleft::before,
.border-bottomleft::after {
content: "\0020";
overflow: hidden;
position: absolute;
}
/* border
* 因,边框是由伪元素区域遮盖在父级
* 故,子级若有交互,需要对子级设置
* 定位 及 z轴
*/
.border::before {
box-sizing: border-box;
top: 0;
left: 0;
height: 100%;
width: 100%;
// border: 1px solid #e6e6e6;
transform-origin: 0 0;
}
.border-top::before,
.border-bottom::before,
.border-topbottom::before,
.border-topbottom::after,
.border-topleft::before,
.border-rightbottom::after,
.border-topright::before,
.border-bottomleft::before {
left: 0;
width: 100%;
height: 1px;
}
.border-right::before,
.border-left::before,
.border-rightleft::before,
.border-rightleft::after,
.border-topleft::after,
.border-rightbottom::before,
.border-topright::after,
.border-bottomleft::after {
top: 0;
width: 1px;
height: 100%;
}
.border-top::before,
.border-topbottom::before,
.border-topleft::before,
.border-topright::before {
// border-top: 1px solid #e6e6e6;
transform-origin: 0 0;
}
.border-right::before,
.border-rightbottom::before,
.border-rightleft::before,
.border-topright::after {
// border-right: 1px solid #e6e6e6;
transform-origin: 100% 0;
}
.border-bottom::before,
.border-topbottom::after,
.border-rightbottom::after,
.border-bottomleft::before {
// border-bottom: 1px solid #e6e6e6;
transform-origin: 0 100%;
}
.border-left::before,
.border-topleft::after,
.border-rightleft::after,
.border-bottomleft::after {
// border-left: 1px solid #e6e6e6;
transform-origin: 0 0;
}
.border-top::before,
.border-topbottom::before,
.border-topleft::before,
.border-topright::before {
top: 0;
}
.border-right::before,
.border-rightleft::after,
.border-rightbottom::before,
.border-topright::after {
right: 0;
}
.border-bottom::before,
.border-topbottom::after,
.border-rightbottom::after,
.border-bottomleft::after {
bottom: 0;
}
.border-left::before,
.border-rightleft::before,
.border-topleft::after,
.border-bottomleft::before {
left: 0;
}
@media (max--moz-device-pixel-ratio: 1.49),
(-webkit-max-device-pixel-ratio: 1.49),
(max-device-pixel-ratio: 1.49),
(max-resolution: 143dpi),
(max-resolution: 1.49dppx) {
/* 默认值,无需重置 */
}
@media (min--moz-device-pixel-ratio: 1.5) and (max--moz-device-pixel-ratio: 2.49),
(-webkit-min-device-pixel-ratio: 1.5) and (-webkit-max-device-pixel-ratio: 2.49),
(min-device-pixel-ratio: 1.5) and (max-device-pixel-ratio: 2.49),
(min-resolution: 144dpi) and (max-resolution: 239dpi),
(min-resolution: 1.5dppx) and (max-resolution: 2.49dppx) {
.border::before {
width: 200%;
height: 200%;
transform: scale(.5);
}
.border-top::before,
.border-bottom::before,
.border-topbottom::before,
.border-topbottom::after,
.border-topleft::before,
.border-rightbottom::after,
.border-topright::before,
.border-bottomleft::before {
transform: scaleY(.5);
}
.border-right::before,
.border-left::before,
.border-rightleft::before,
.border-rightleft::after,
.border-topleft::after,
.border-rightbottom::before,
.border-topright::after,
.border-bottomleft::after {
transform: scaleX(.5);
}
}
@media (min--moz-device-pixel-ratio: 2.5),
(-webkit-min-device-pixel-ratio: 2.5),
(min-device-pixel-ratio: 2.5),
(min-resolution: 240dpi),
(min-resolution: 2.5dppx) {
.border::before {
width: 300%;
height: 300%;
transform: scale(.33333);
}
.border-top::before,
.border-bottom::before,
.border-topbottom::before,
.border-topbottom::after,
.border-topleft::before,
.border-rightbottom::after,
.border-topright::before,
.border-bottomleft::before {
transform: scaleY(.33333);
}
.border-right::before,
.border-left::before,
.border-rightleft::before,
.border-rightleft::after,
.border-topleft::after,
.border-rightbottom::before,
.border-topright::after,
.border-bottomleft::after {
transform: scaleX(.33333);
}
}
/* stylelint-enable */
3.2)场景:设计稿为750px
我为什么说是一样的呢
之前的知识,750px是ui的物理像素,窗口375逻辑像素,正好相差一倍。我们开发移动端的时候,所得像素除以2,但你每次除以2有点呆呆,怎么结合我们实际情况来呢。简单 - 要是设计稿就是375的就好了。也不用ui去改,市面上主流使用的设计稿,都有比例切换
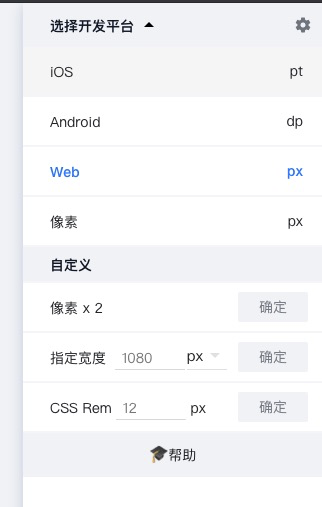
我们公司ui使用的蓝湖,怎么用?
正常750px的比例 - 点击右上角web - 发现比例不能修改,但是我们能选择ios。ios的比例就是375的,这个时候就所见单位,就是你的像素单位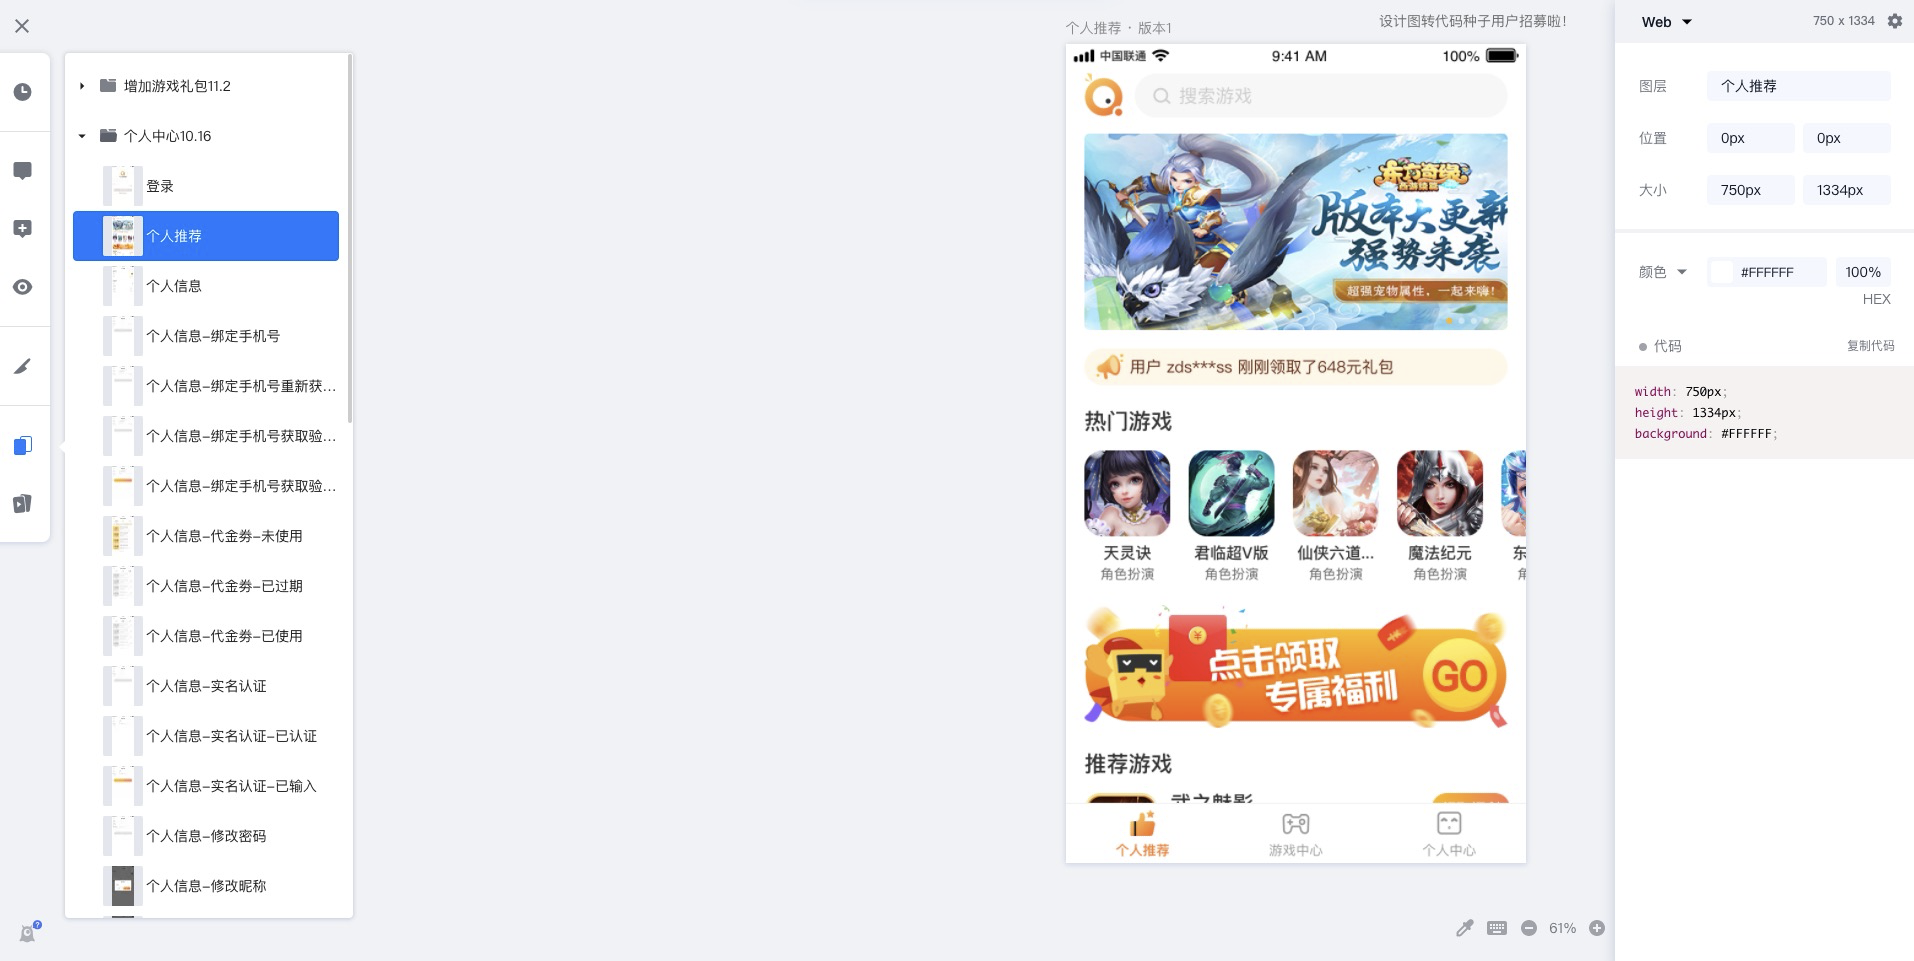
文章已具雏形,需进一步聚焦核心问题。
文笔细腻,描写生动,画面感跃然纸上。
哈哈哈,写的太好了https://www.lawjida.com/
《盲女凶杀案》恐怖片高清在线免费观看:https://www.jgz518.com/xingkong/54000.html
你的文章让我感受到了快乐,每天都要来看一看。 http://www.55baobei.com/j7auo994hA.html
你的文章让我感受到了快乐,每天都要来看一看。 http://www.55baobei.com/Ntsazc90iG.html
《偶像的惊喜第一季》欧美综艺高清在线免费观看:https://www.jgz518.com/xingkong/124702.html
你的文章让我感受到了快乐,每天都要来看一看。 http://www.55baobei.com/Ntsazc90iG.html
你的文章内容非常卖力,让人点赞。 http://www.55baobei.com/jHe4eNAhHn.html
探讨传奇私服关闭声音快捷键的使用与优化:https://501h.com/lianji/2024-10-18/43156.html
你的文章让我学到了很多知识,非常感谢。 http://www.55baobei.com/5iKgIhssPQ.html
想想你的文章写的特别好https://www.237fa.com/
想想你的文章写的特别好